Orbital sanders should be in every woodworking shop. Of course, with every tool, there’s a bit of a ‘learning curve’ – even with a tool as simple to use as an orbital sander. Since orbital sanders are primarily used for finishing work or sanding, you must be extra careful in how you operate it. Otherwise, you may end with unsightly and unwanted swirls ingrained in the wood.
An orbital sander will leave swirls if you press too hard and if the grit of the sandpaper is too low. Choosing a higher grit sandpaper will help reduce the chances of swirls from an orbital sander. A grit of 180 or higher is recommended.
It’s possible to avoid sanding swirls, but it requires a little bit of knowledge in the basics of orbital sanders and the finishing process. If you are just beginning with an orbital sander, make sure to read through each step below carefully so you don’t miss anything important.
Let’s begin!
What are Orbital Sanders Used for?
Let’s start with understanding what orbital sanders are meant for. The name itself can be slightly misleading as they don’t orbit or spin as the name suggests.
The sanding motion is what can be described as circular and the pad rotates at a speed somewhere between 2000 and 3000 rpm, thus causing the surface area being sanded to be removed evenly.
This makes it easier for you to finish the surface as you don’t have to worry about uneven surfaces or brush marks from long sanding with hand sandpaper.
An orbital sander is a tool used to remove small amounts of wood quickly when sanding down a surface.
Typically, an orbital sander is used to do finishing sanding work mostly. You can use a lower grit paper if you need to remove layers of paint on smaller pieces of woodwork. Orbital sanders can be used on wood, metal, or other hard surfaces.
Orbital sanders are for use on larger projects than a palm sander, however, I use my orbital for just about any job, no matter how small the wood happens to be. Therefore, you don’t need to own both types of sanders if you don’t want to invest that much money at the moment.
How to Use an Orbital Sander to Avoid Swirls
Before you get started, you should know what it is you are trying to accomplish. Are you finishing wood for painting or staining? You need to know how you want your project to look when completed. This sounds obvious, but it’s worth mentioning.
Once you know what the desired end-result is, you can make sure you have the correct grit sandpaper on-hand. Here’s a quick reference on sanding paper grits before I explain how to get the desired result.
- #60 to #80 grit is coarse paper and can be used to take off a layer of paint.
- #100 to #150 paper is a medium grit and can be used for taking down rough wood.
- #180 to #220 grit paper is fine and can be used for some finishing work and smaller jobs where marks in the wood won’t really be noticed.
- #320 is an ultra fine grit paper and should be used when the smoothest of surfaces is the desired result.
Step 1 – Starting from scratch, use a damp or dry, sponge or cloth to clean away all the dust on the surface of the object you will be sanding. I see a lot of people who just start sanding without doing this. I wipe down the wood before I start sanding and during as well.
In my opinion, it really makes a difference in how the finished product looks.
Step 2 – As mentioned previously, a higher grit paper is recommended for sanding smaller jobs. You can start with using 180 grit if you’re going for this type of job. Sanding with a paper that doesn’t have much grit will leave marks on the surface that are difficult to remove.
if you are sanding something such as paint off wood, then use a lower grit paper to start before moving to a higher grit once the paint has been removed. If you’re starting with bare wood, you can immediately jump to 180 grit paper.
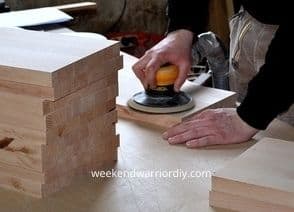
Step 3 – Once you have your sander paper ready (and hearing and eye protection on as well), turn the sander on, placing the sander directly onto wood.
Don’t press down unless you are trying to take down ridges in the wood or taking paint off.
Step 4 – This is the most important thing for you to know when operating an orbital sander.
Hold the sander firmly so it doesn’t get away on you and allow it to do its job. The weight of the sander combined with the grit of the sandpaper should be enough to sand the wood.
I always say less is more. It’s harder to sand out swirl marks in wood than it is to just not have them show up in the first place.
Step 5 – Make mental notes on how the sander feels and how it pulls while holding it.
I either hold the sander stationery or move it slowly in a clockwise circular motion.
If you’re finding that when you do that, you’re getting swirl marks, then move the sander form left to right (side to side). That will stop the swirling marks as well.

How Do You Remove Swirls in Wood Created by an Orbital Sander?
Until you get better, sometimes, you’re just going to find you are ending up with swirls or scratches in your wood projects after using an orbital or any sander for that matter.
Here are some ideas on how you can remove swirl marks in wood.
- Using a much higher grit sandpaper (220 and higher), take some in your hand and lightly sand in a random pattern until you see that the swirl has vanished.
- Dampening the wood before you sand sometimes helps to take out swirls. I’m saying damp, not wet. If you dampen the wood too much, when you go to sand it again, it’s going to look worse.
- I haven’t used this product, but I have heard that the 3M Scratch Removal Kits can also work.
- Most of all, it’s about practice and sometimes you might have to start a project over to get the result you are looking for.
If I can recommend a good orbital sander, I would go with this one over on Amazon, if you’re a beginner. Make sure to get yourself a good variety of sandpaper to be ready for any job that comes your way.
Conclusion
In conclusion, I hope that this article has helped you get a better understanding of orbital sanders. This is just the basics. If you take a little time to practice and get used to the sander, you’ll find that it’s actually fun to use as well.
Don’t be afraid to try out different things and remember ‘practice makes perfect.’ I would love to hear from anyone who has questions, ideas or just wants to share their own experiences.
The key point to remember about using a sander with an orbital action is that when you’re first starting out, it’ll take a few practice runs for you to learn how to apply just the right amount of pressure based on what grit of sandpaper you’re using.
Thanks for reading and good luck!
Related Posts
Can You Do Woodworking without a Table Saw?
Unlocking the Potential of Drum Sanders: A Woodworker’s Secret